Hi Crochet Lover!
The arrival of October and my growing love for pumpkin soup, came together to bring to life this simple but beautiful tutorial: crochet pumpkin.
At the end of this post you will find the step-by-step video tutorial, you can also watch it on my YouTube channel.
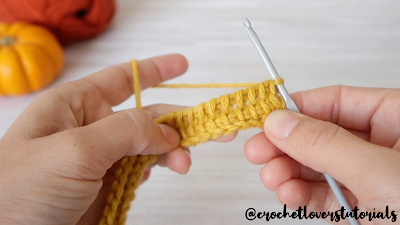
Today we are going to learn how to crochet a pumpkin, and it is not just any pumpkin... to spice things up a bit, we'll do it using 2 stitches from Tunisian Crochet: the Tunisian Simple Stitch and the Tunisian Purl Stitch (or backwards stitch).
I've been wanting to use this last stitch it for some time, but maybe the word backwards pushed me back a bit. To be more honest, I was terrified to use it. But I discovered that it was an unfounded fear... it turns out that it's as simple as the Simple Tunisian Crochet and -small bonus- it has a spectacular texture.
Then write down the list of materials because we are going to start!
MATERIALS:
ESTIMATED TIME: an afternoon, ideal for crocheting while having coffee with friends!
We then start by crocheting a chain as long as the width of your project. Here's a guide to the measurements you need to make for each size:
DIMENSIONS OF THE FABRIC:
- Small crochet pumpkin: 10 x 25 cm
- Medium crochet pumpkin: 15 x 37 cm
- Large crochet pumpkin: 21 x 50 cm
Then we'll crochet the king of the night: The Tunisian Purl! In the video tutorial I explain it step by step so you have no excuse! After seeing its grooved texture you won't be able to deny it a place in your heart :)
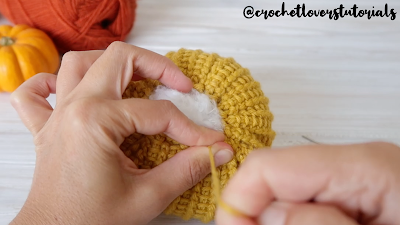
We will join the two ends of our rectangle, creating a kind of tube. Then, with a yarn needle, we will go through all the stitches on one side. This way we'll be able to close one end of the pumpkin.
And that's all dear crocheter! Now you only have to watch the step-by-step video tutorial for us to crochet together this beautiful pumpkin!
Hugs and happy crochet,
Helena
The arrival of October and my growing love for pumpkin soup, came together to bring to life this simple but beautiful tutorial: crochet pumpkin.
At the end of this post you will find the step-by-step video tutorial, you can also watch it on my YouTube channel.
 |
| Crochet Pumpkin Tutorial | Crochet Lovers |
I've been wanting to use this last stitch it for some time, but maybe the word backwards pushed me back a bit. To be more honest, I was terrified to use it. But I discovered that it was an unfounded fear... it turns out that it's as simple as the Simple Tunisian Crochet and -small bonus- it has a spectacular texture.
Then write down the list of materials because we are going to start!
MATERIALS:
- 20 to 50 grams of yarn of medium thickness (between 3 and 6 mm), depending on the size of the pumpkin
- For small and medium pumpkin: standard hook, slightly thinner than your wool
- For large pumpkin: Tunisian hook, slightly thinner than your wool
- Padding for cushions / dolls can be natural or synthetic
- Yarn needle and scissors
- Pumpkin Decoration
ESTIMATED TIME: an afternoon, ideal for crocheting while having coffee with friends!
We then start by crocheting a chain as long as the width of your project. Here's a guide to the measurements you need to make for each size:
DIMENSIONS OF THE FABRIC:
- Small crochet pumpkin: 10 x 25 cm
- Medium crochet pumpkin: 15 x 37 cm
- Large crochet pumpkin: 21 x 50 cm
When you have your chain stitches, we start the base row of Tunisian crochet, take out a yarn over of each available chain and leave them mounted on the crochet. That's why, if you want to crochet the big pumpkin, you must use a Tunisian Crochet hook to fit all the yarn overs.
We will go back through the yarn overs as you can see in the step-by-step video tutorial at the end of this post. Then create a row of Simple Tunisian Stitch.
 |
| Tunisian Simple Stitch | Crochet Lovers Tutorials |
Then we'll crochet the king of the night: The Tunisian Purl! In the video tutorial I explain it step by step so you have no excuse! After seeing its grooved texture you won't be able to deny it a place in your heart :)
And so we will continue, alternating a row of Simple Tunisian Crochet and a row of Tunisian Purl Stitch, until you reach the length of the project, according to the dimensions I gave you.
We will do the same with the other side of the crochet "tube", this time introducing the filling little by little. Our pumpkin is almost ready.
To finish, we will make those cracks so characteristic of pumpkins. For this, we will use the same thread, as I show you in the video tutorial.
Finally, we only have to decorate our pumpkin as we like: a natural stick, a little jute, autumn leaves, a cinnamon stick... let your imagination run wild.
And that's all dear crocheter! Now you only have to watch the step-by-step video tutorial for us to crochet together this beautiful pumpkin!
Hugs and happy crochet,
Helena


